本文最后更新于 509 天前,其中的信息可能已经有所发展或是发生改变。
前两天受GitHub上的一个项目memos的启发,决定写一个笔记应用来练练手,检验以下flutter学习成果!
页面设计:
主页(展示标题和笔记列表)
设置页(没做)
关于页(几行字)
笔记详细展示页(标题及内容)
编辑/添加页
开始:
首先先写GetX的部分。明确要做的功能:添加/删除/编辑笔记,程序打开时读取本地存储,笔记发生修改时存储到本地。把这些函数写出来到data.dart如下:
import 'dart:convert';
import 'package:flutter/material.dart';
import 'package:get/get.dart';
import 'package:intl/intl.dart';
import 'package:shared_preferences/shared_preferences.dart';

class GlobalController extends GetxController {
  static GlobalController instance = Get.find();
  List memos = <Memo>[].obs;
  var theme = ThemeData.light().obs;

  @override
  void onInit() {
    super.onInit();
    _loadMemos();
  }

  _loadMemos() async {
    SharedPreferences prefs = await SharedPreferences.getInstance();
    if (prefs.containsKey('memos')) {
      List<String> memosStringList = prefs.getStringList('memos')!;
      memos.assignAll(memosStringList.map((memoString) {
        Map<String, dynamic> memoMap = json.decode(memoString);
        return Memo(
          title: memoMap['title'],
          description: memoMap['description'],
          time: memoMap['time'],
        );
      }).toList());
    }
  }

  _saveMemos() async {
    SharedPreferences prefs = await SharedPreferences.getInstance();
    List<String> memosStringList = memos
        .map((memo) => json.encode({
              'title': memo.title,
              'description': memo.description,
              'time': memo.time,
            }))
        .toList();
    prefs.setStringList('memos', memosStringList);
  }

  void changeTheme() {
    Get.changeTheme(Get.isDarkMode ? ThemeData.light() : ThemeData.dark());
  }

  void addMemo(String title, String description) {
    memos.add(Memo(
      title: title,
      description: description,
      time: DateFormat('yyyy-MM-dd HH:mm:ss').format(DateTime.now()),
    ));
    update();
    _saveMemos();
  }

  void deleteMemo(int index) {
    memos.removeAt(index);
    update();
    _saveMemos();
  }

  void editMemo(int index, String title, String description) {
    memos[index] = Memo(
      title: title,
      description: description,
      time: DateFormat('yyyy-MM-dd HH:mm:ss').format(DateTime.now()),
    );
    update();
    _saveMemos();
  }
}

class Memo {
  final String title;
  final String description;
  final String time;

  Memo({required this.title, required this.description, required this.time});
}
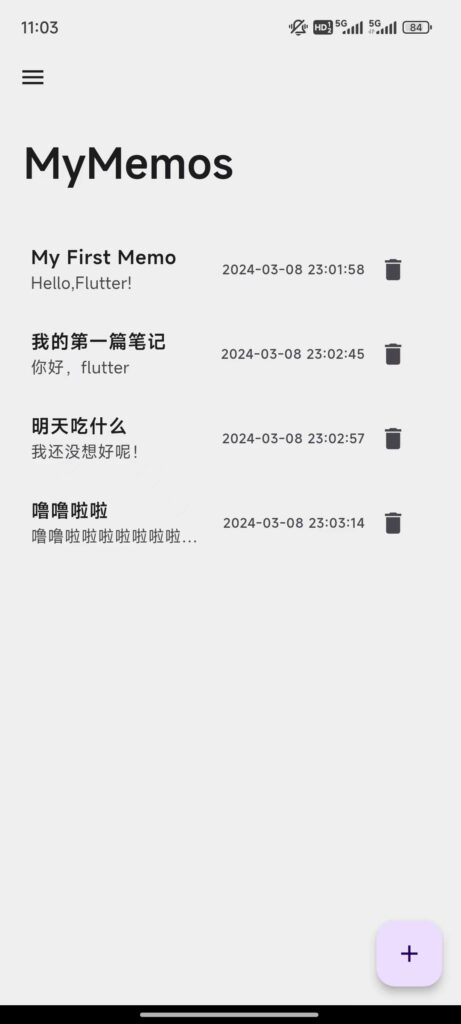
上面的代码中我们定义了一个Memo笔记类用来描述笔记对象,同时写了添加/删除/编辑/保存/读取五个关键函数。然后就可以开始页面设计了。首先是首页,我在脑子里进行了粗略的UI设计,决定把标题拿到appBar下面,并且采用全局灰色背景,标题下展示笔记列表,简单明了。
我的HomePage源码如下:
class Homepage extends StatefulWidget {
  const Homepage({Key? key}) : super(key: key);

  @override
  State<Homepage> createState() => _HomepageState();
}

class _HomepageState extends State<Homepage> {
  @override
  Widget build(BuildContext context) {
    return Scaffold(
      appBar: AppBar(
        backgroundColor: Colors.grey[200],
      ),
      drawer: const MyDrawer(),
      body: Column(
        mainAxisAlignment: MainAxisAlignment.start,
        children: [
          Container(
            width: double.infinity,
            padding: const EdgeInsets.all(20),
            color: Colors.grey[200],
            child: const Text(
              'MyMemos',
              style: TextStyle(fontWeight: FontWeight.bold, fontSize: 35),
            ),
          ),
          Expanded(
            flex: 1,
            child: MemosList(),
          ),
        ],
      ),
      floatingActionButton: FloatingActionButton(
        onPressed: () {
          Get.to(() => EditPage(type: 'add',title: '',description: ''));
        },
        child: const Icon(Icons.add),
      ),
    );
  }
}
实际效果:

顺便把Drawer和设置页关于页写一下,我自己也没写啥,这里就不好意思介绍了。
至于编辑笔记和添加笔记,为了减少工作量,我使用了同一个页面,每次路由传参告知页面是新增还是编辑,让里面的组件随之适应显示。
class EditPage extends StatelessWidget {
  final GlobalController globalController = Get.find();
  final String type, title, description;

  EditPage(
      {super.key,
      required this.type,
      required this.title,
      required this.description});

  @override
  Widget build(BuildContext context) {
    final TextEditingController titleController = (type != 'add')
        ? TextEditingController(text: title)
        : TextEditingController();
    final TextEditingController descriptionController = (type != 'add')
        ? TextEditingController(text: description)
        : TextEditingController();
    return Scaffold(
      appBar: AppBar(
        leading: IconButton(
          icon: const Icon(Icons.arrow_back),
          onPressed: () {
            Get.back();
          },
        ),
        backgroundColor: Colors.grey[200],
      ),
      body: Container(
        color: Colors.grey[200],
        child: Padding(
          padding: const EdgeInsets.all(20),
          child: Column(
            children: [
              TextField(
                controller: titleController,
                maxLines: 1,
                decoration: const InputDecoration(
                  labelText: 'Title',
                  border: OutlineInputBorder(),
                ),
              ),
              const SizedBox(height: 20),
              Expanded(
                child: TextField(
                  controller: descriptionController,
                  style: const TextStyle(height: 1.5),
                  maxLines: null,
                  expands: true,
                  decoration: const InputDecoration(
                    labelText: 'Content',
                    border: OutlineInputBorder(),
                  ),
                ),
              ),
              const SizedBox(height: 20),
              OutlinedButton(
                onPressed: () {
                  if (type == 'add') {
                    globalController.addMemo(
                      titleController.text,
                      descriptionController.text,
                    );
                    Get.back();
                    Get.snackbar('Message', 'Memo added.');
                  } else {
                    globalController.editMemo(
                      globalController.memos.indexWhere(
                        (element) => element.title == title,
                      ),
                      titleController.text,
                      descriptionController.text,
                    );
                    Get.back();
                    Get.snackbar('Message', 'Memo edited.');
                  }
                },
                style: ButtonStyle(
                  minimumSize: MaterialStateProperty.all(const Size(100, 50)),
                  shape: MaterialStateProperty.all(
                    RoundedRectangleBorder(
                      borderRadius: BorderRadius.circular(10),
                    ),
                  ),
                ),
                child: (type == 'add')
                    ? const Text('Add Memo')
                    : const Text('Confirm Edit'),
              ),
            ],
          ),
        ),
      ),
    );
  }
}
随后根据传入参数调用data中写好的添加和编辑函数即可!
详细页更是简单,做一下UI设计就好了。很简陋的一个小项目!
class MemoPage extends StatelessWidget {
  final GlobalController globalController = Get.find();
  final int index;

  MemoPage({super.key, required this.index});

  @override
  Widget build(BuildContext context) {
    return Scaffold(
        appBar: AppBar(
          leading: IconButton(
            icon: const Icon(Icons.arrow_back),
            onPressed: () {
              Get.back();
            },
          ),
          backgroundColor: Colors.grey[200],
        ),
        body: Obx(() => Column(
              mainAxisAlignment: MainAxisAlignment.start,
              children: [
                Container(
                  width: double.infinity,
                  padding: const EdgeInsets.fromLTRB(20, 20, 20, 10),
                  color: Colors.grey[200],
                  child: Text(
                    globalController.memos[index].title,
                    style: const TextStyle(
                        fontWeight: FontWeight.bold, fontSize: 35),
                  ),
                ),
                Container(
                  width: double.infinity,
                  padding: const EdgeInsets.fromLTRB(25, 0, 25, 0),
                  color: Colors.grey[200],
                  child: Text(
                    'Edited on ${globalController.memos[index].time}',
                    style: const TextStyle(
                        fontStyle: FontStyle.italic, fontSize: 12),
                  ),
                ),
                Expanded(
                  flex: 1,
                  child: Container(
                    width: double.infinity,
                    color: Colors.grey[200],
                    padding: const EdgeInsets.all(20),
                    child: SingleChildScrollView(
                      child: Text(
                        globalController.memos[index].description,
                        style: const TextStyle(fontSize: 20,height: 1.5),
                      ),
                    ),
                  ),
                ),
              ],
            )),
        floatingActionButton: FloatingActionButton(
          onPressed: () {
            Get.to(() => EditPage(
                type: 'edit',
                title: globalController.memos[index].title,
                description: globalController.memos[index].description));
          },
          child: const Icon(Icons.edit),
        ));
  }
}Github仓库:FoyonaCZY/my-memos-flutter: A simple Flutter memo app (github.com)

